


How to use
Try to find an edge perfectly spanning 3 frets
1) Viewing it sideway, see if the edge you picked nicely touches 3 adjacent frets.
In short, only three protrusions of frets should evenly be situated lengthwise.

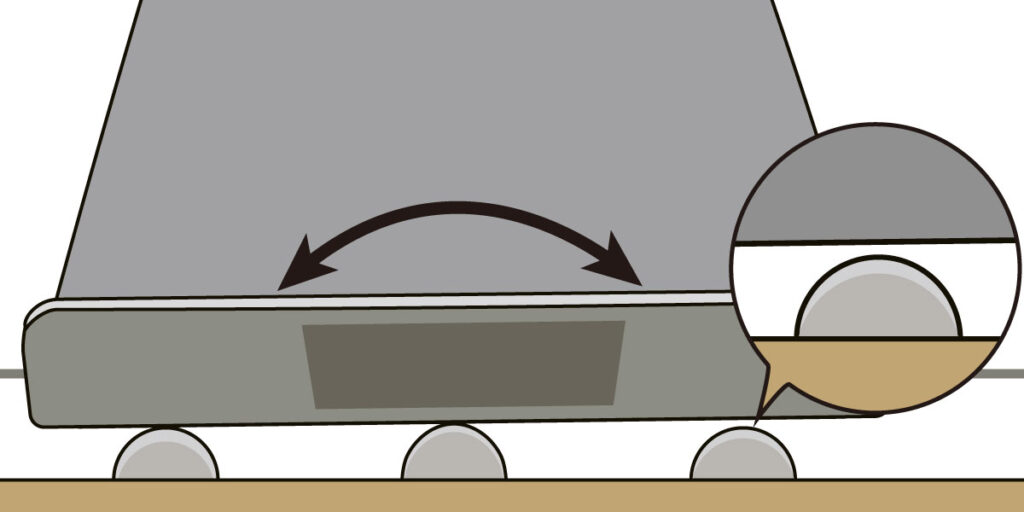
You can check the fret level while strings are on!
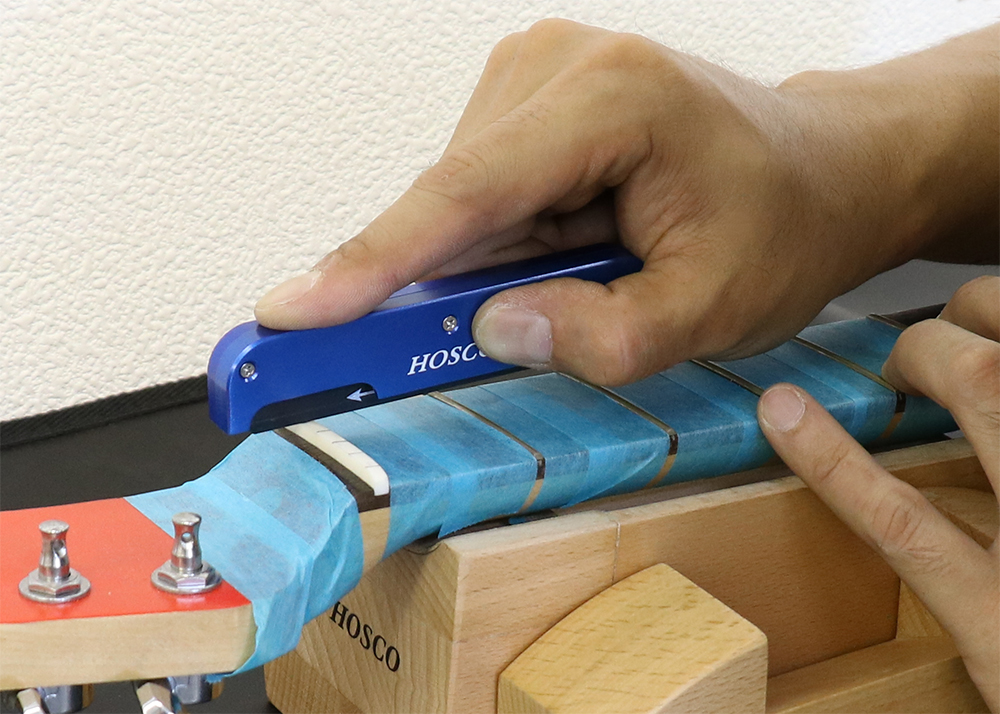
2) Set the Zone file so that it passes under the strings to be checked. Select a zone file that is long enough to span the three frets to be checked. Tilt the zone file so that its edges touch the three frets, and check with both hands to see if there is any rattling. If there is no rattling, move the file by one fret and continue the check in the same manner.
You can adjust the fret level while strings are on!
3) If there is any sagging, it means that the center fret is high.
Set the Zone file so that the diamond file surface touches the fret, and gradually sand it to adjust.
While doing this, check as in step 1) to see if the fret level is even.
If necessary, remove the strings and shape the crown with a crown file.
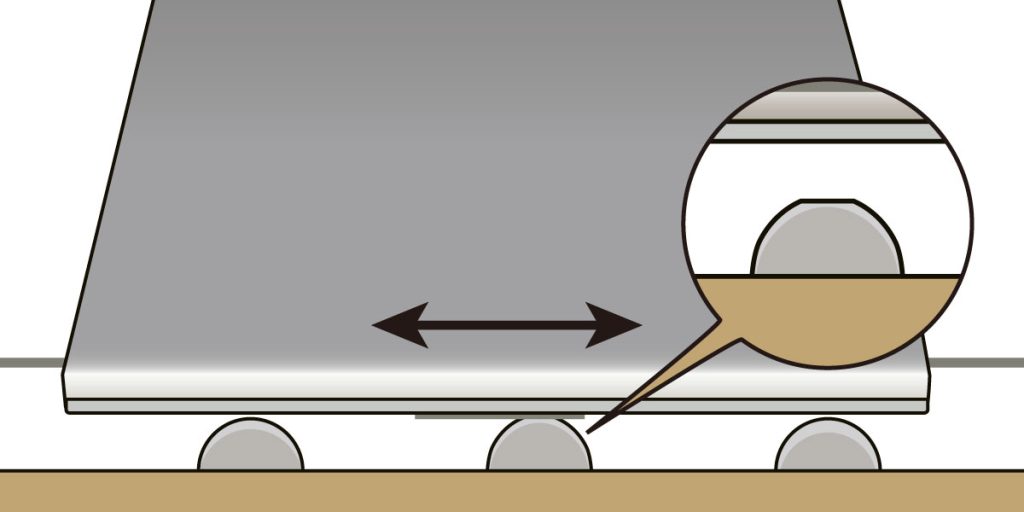
How to use
Try to find an edge perfectly spanning 3 frets
1) Viewing it sideway, see if the edge you picked nicely touches 3 adjacent frets.
In short, only three protrusions of frets should evenly be situated lengthwise.
You can check the fret level while strings are on!
2) Set the Zone file so that it passes under the strings to be checked. Select a zone file that is long enough to span the three frets to be checked. Tilt the zone file so that its edges touch the three frets, and check with both hands to see if there is any rattling. If there is no rattling, move the file by one fret and continue the check in the same manner.
You can adjust the fret level while strings are on!
3) If there is any sagging, it means that the center fret is high.
Set the Zone file so that the diamond file surface touches the fret, and gradually sand it to adjust.
While doing this, check as in step 1) to see if the fret level is even.
If necessary, remove the strings and shape the crown with a crown file.
How to use
Try to find an edge perfectly spanning 3 frets
1) Viewing it sideway, see if the edge you picked nicely touches 3 adjacent frets.
In short, only three protrusions of frets should evenly be situated lengthwise.
You can check the fret level while strings are on!
2) Set the Zone file so that it passes under the strings to be checked. Select a zone file that is long enough to span the three frets to be checked. Tilt the zone file so that its edges touch the three frets, and check with both hands to see if there is any rattling. If there is no rattling, move the file by one fret and continue the check in the same manner.
You can adjust the fret level while strings are on!
3) If there is any sagging, it means that the center fret is high.
Set the Zone file so that the diamond file surface touches the fret, and gradually sand it to adjust.
While doing this, check as in step 1) to see if the fret level is even.
If necessary, remove the strings and shape the crown with a crown file.
How to use
Try to find an edge perfectly spanning 3 frets
1) Viewing it sideway, see if the edge you picked nicely touches 3 adjacent frets.
In short, only three protrusions of frets should evenly be situated lengthwise.
You can check the fret level while strings are on!
2) Set the Zone file so that it passes under the strings to be checked. Select a zone file that is long enough to span the three frets to be checked. Tilt the zone file so that its edges touch the three frets, and check with both hands to see if there is any rattling. If there is no rattling, move the file by one fret and continue the check in the same manner.
You can adjust the fret level while strings are on!
3) If there is any sagging, it means that the center fret is high.
Set the Zone file so that the diamond file surface touches the fret, and gradually sand it to adjust.
While doing this, check as in step 1) to see if the fret level is even.
If necessary, remove the strings and shape the crown with a crown file.
How to use
Try to find an edge perfectly spanning 3 frets
1) Viewing it sideway, see if the edge you picked nicely touches 3 adjacent frets.
In short, only three protrusions of frets should evenly be situated lengthwise.
You can check the fret level while strings are on!
2) Set the Zone file so that it passes under the strings to be checked. Select a zone file that is long enough to span the three frets to be checked. Tilt the zone file so that its edges touch the three frets, and check with both hands to see if there is any rattling. If there is no rattling, move the file by one fret and continue the check in the same manner.
You can adjust the fret level while strings are on!
3) If there is any sagging, it means that the center fret is high.
Set the Zone file so that the diamond file surface touches the fret, and gradually sand it to adjust.
While doing this, check as in step 1) to see if the fret level is even.
If necessary, remove the strings and shape the crown with a crown file.
Check the video and learn how well H-TO-15 works.
Features
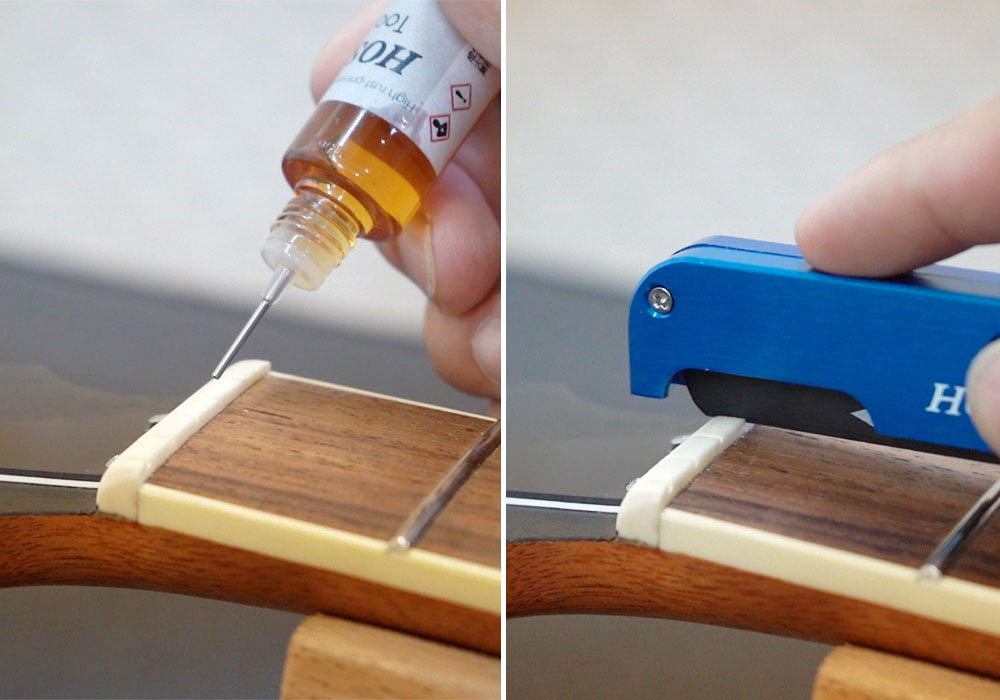
Reduce friction in filing and sawing operations
It reduces friction between the file and the nut.
You can make finer nut slot adjustments with less force.
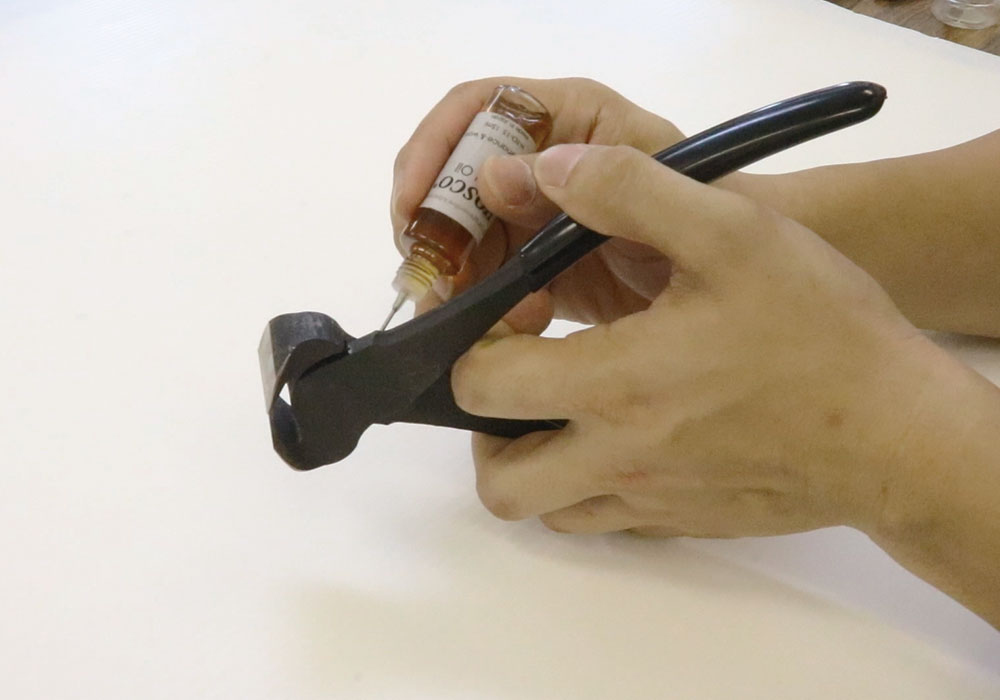
For lubricating the pivot point of pliers
Lubricate the pivot point of the plier with H-TO-15 for smooth movement.
You can use the plier for the long time with non-stressful and a light touch.
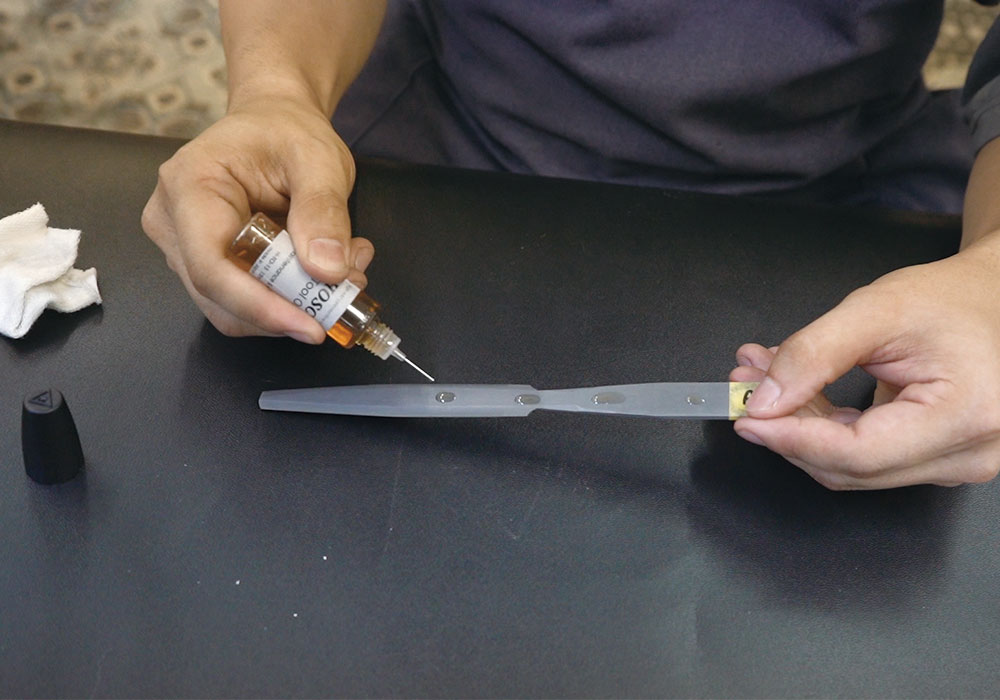
High rust-preventive effect
A thin coating of H-TO-15 provides a long-lasting high rust-preventive effect.

Meet air safety regulations
It meets air safety regulations and can be transported by air plane.
We can provide the SDS (Safety Data Sheet).

Meet environmental regulations (RoHS, PFOS and REACH)
It is chlorine-free, halogen-free, solid lubricant-free, and contains no regulated substances.
And it does not adversely affect rubber and resin materials.
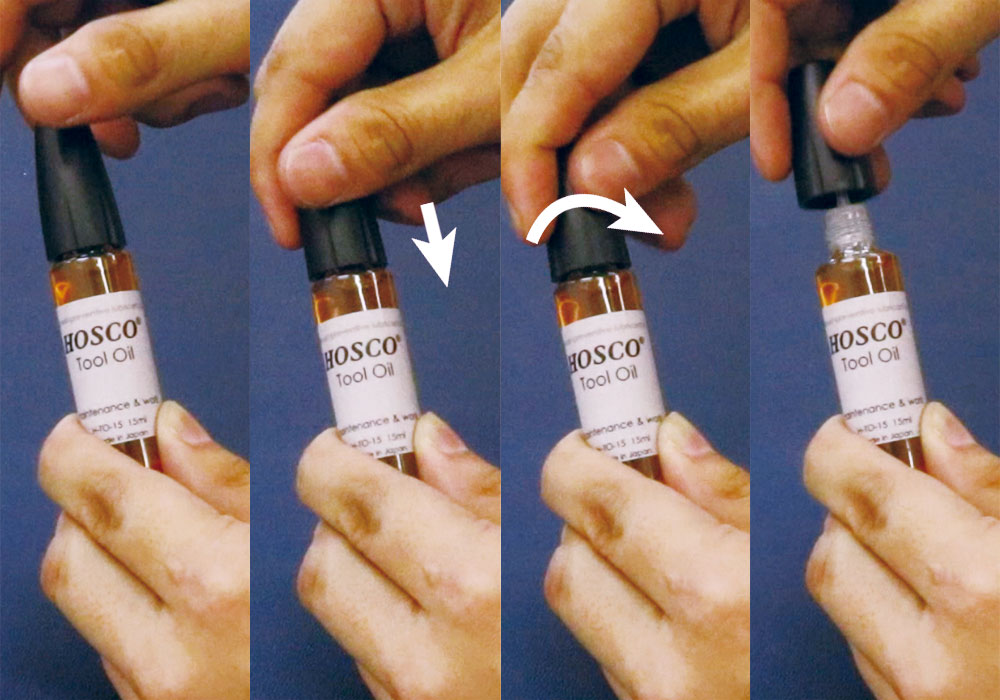
H-TO-15 is filled in a plastic bottle with child safety bottle cap.
How to remove and screw the cap is shown as the left.
Turn the cap counter-clockwise to open, while pressing it down.
What is great on the String Guide Saw?
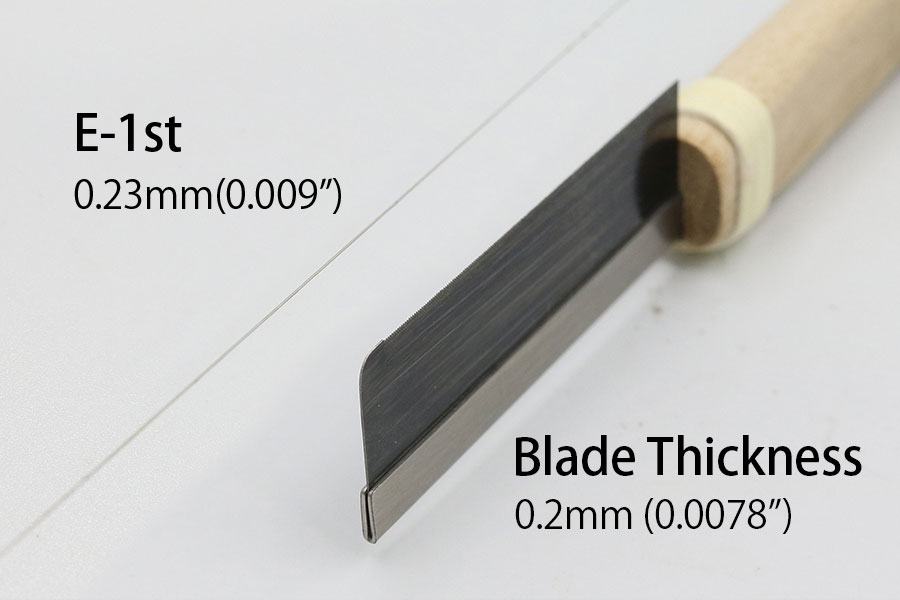
Should not make a wider notch than high-E string
The thickness of blade is just 0.0078″ (0.2mm) and it is thinner than common high-E string gauge 0.009″(0.23mm).
You can use this saw to make the first notch even for the high-E string.
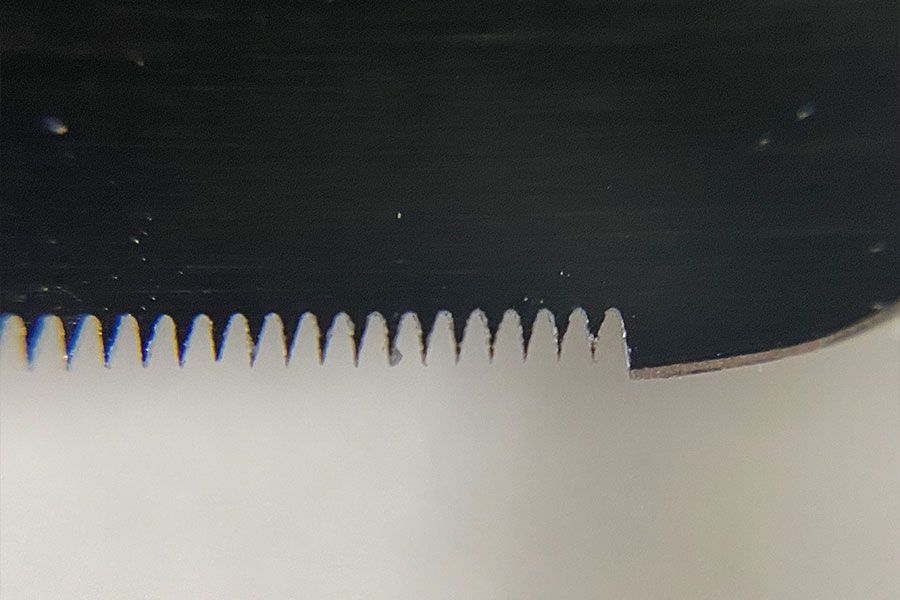
Tiny teeth bite well
The saw blade will not slip on even slippery string nuts.
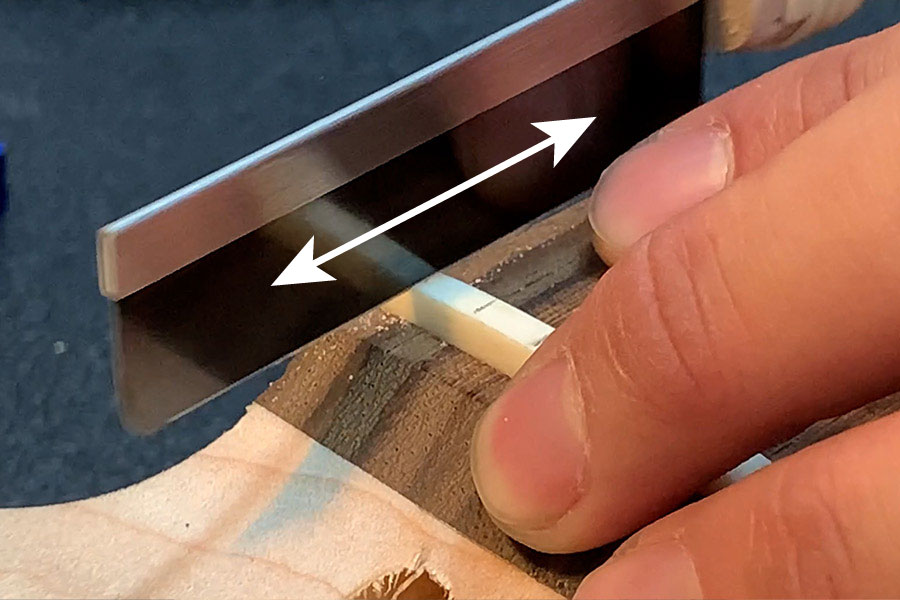
Dual use for both strokes
It can be used with both of Push and Pull stroke.
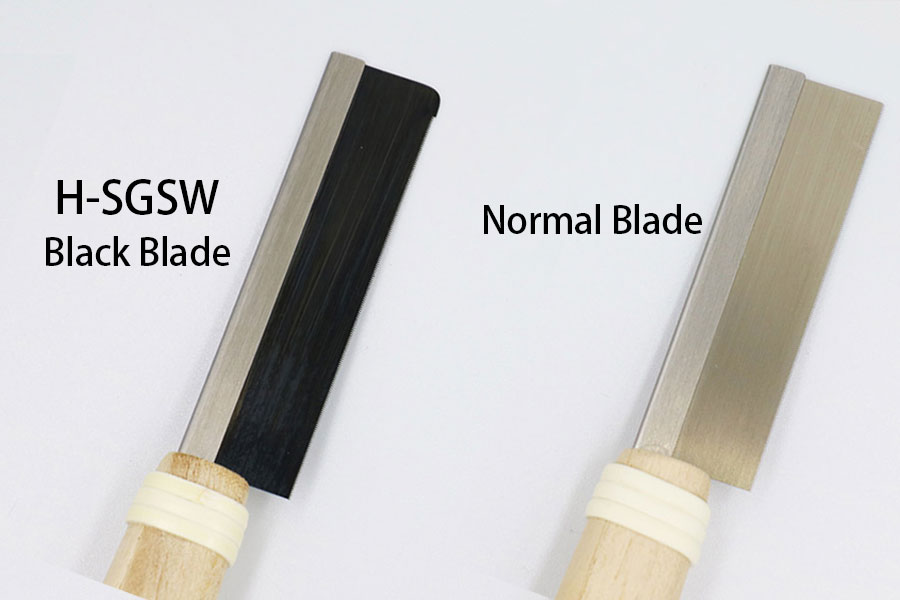
Black-colored saw blade
The “blackish” saw blade helps you to see clearly where you are cutting.
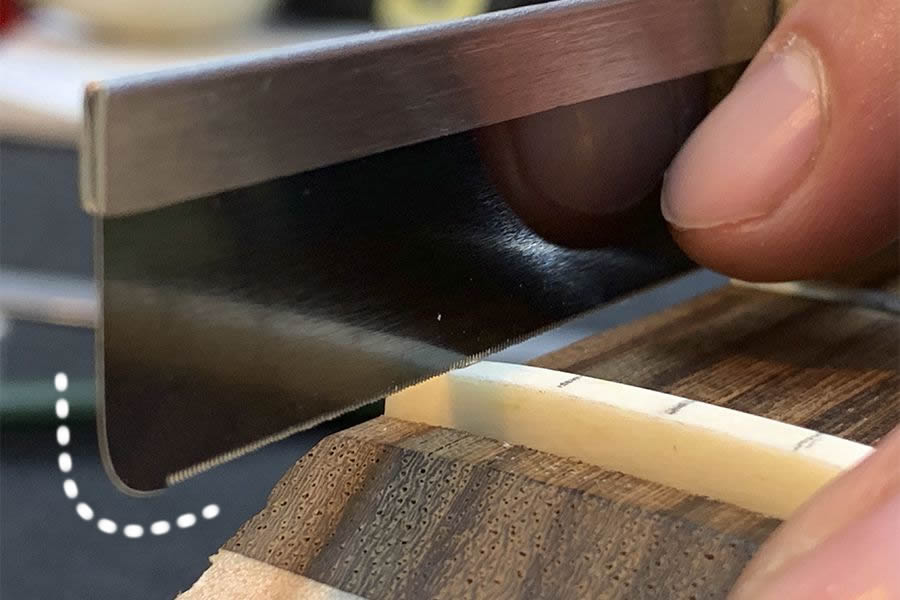
Round edge of saw blade
The round edge prevents from scratching the headstock, fingerboard, frets, and so on.
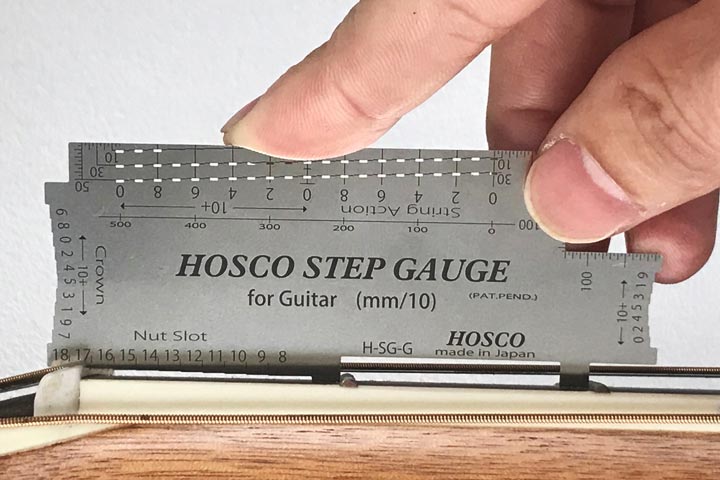
3 basic functions
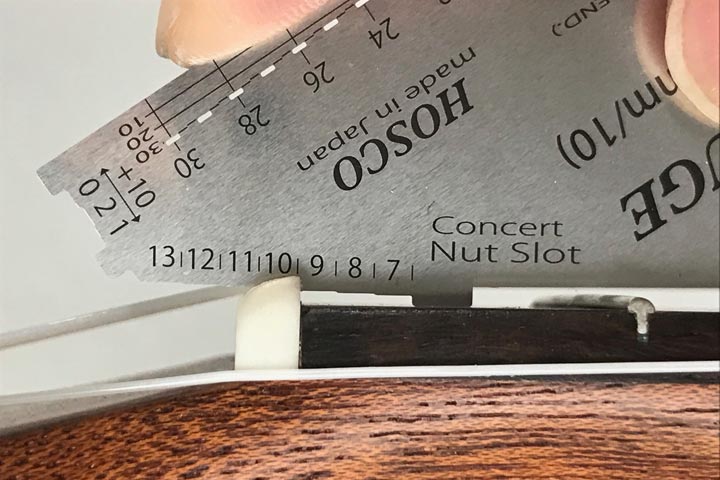
“Nut slot height”
by 0.1mm correctly
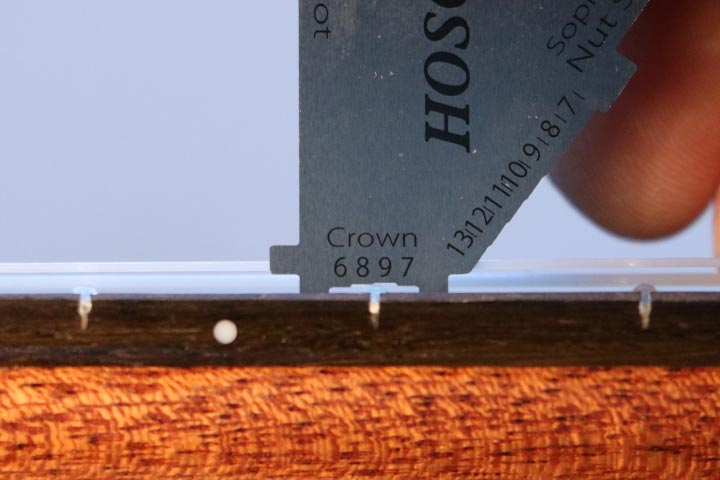
“Fret crown height”
by 0.1mm quickly
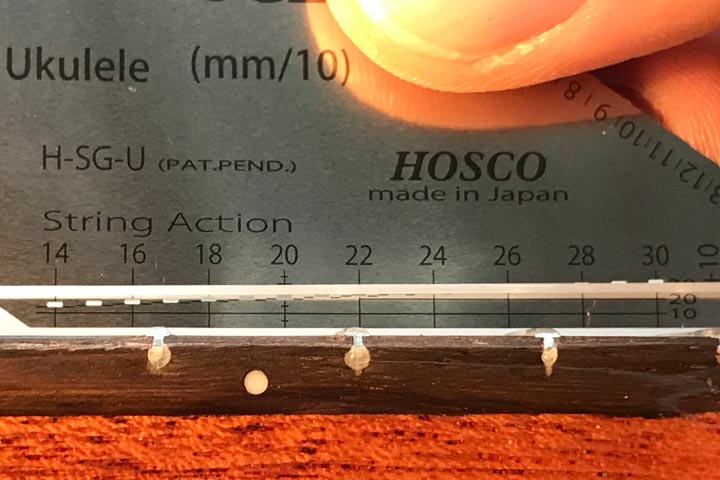
“String action”
by 0.1mm clearly with slits
How to use
Nut Slot height
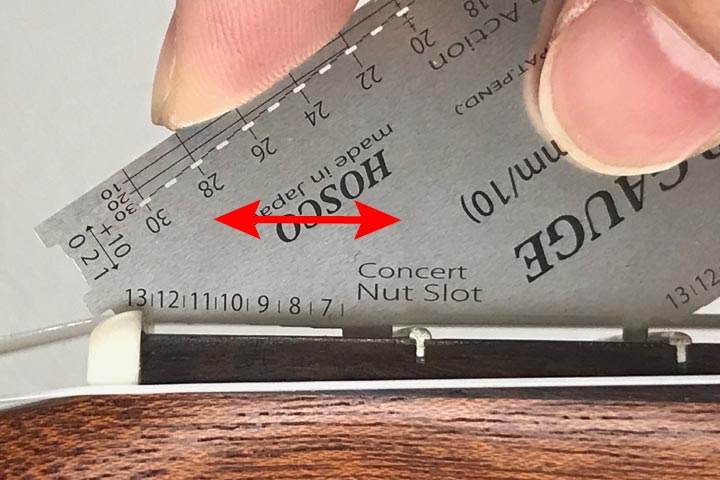
STEP. 1
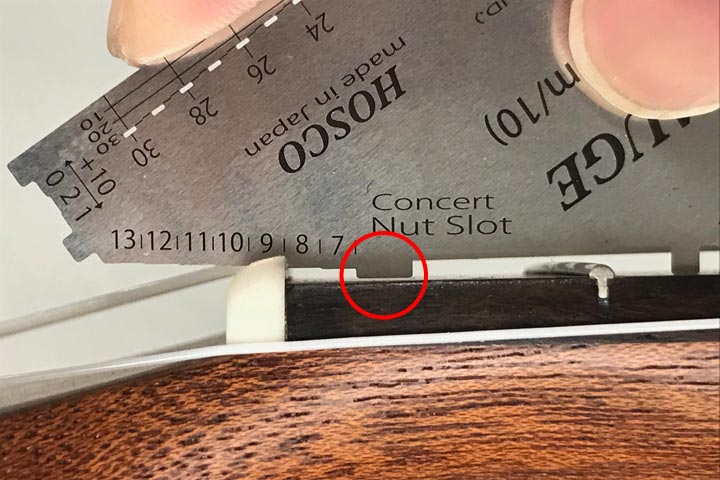
Set Step Gauge (Nut Slot part) in the string slot which you want to check, and then put Step Gauge (2 legs) to contact a fingerboard.
Slide the gauge to headstock keeping both legs contacting a fingerboard. Step Gauge will stop when the gauge contacts nut slot.
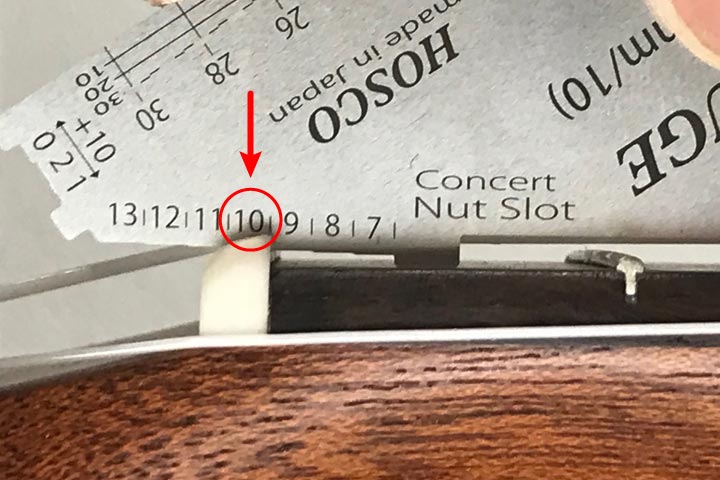
STEP. 2
Read the number on the nut. Number is 10 times of mm. So divide by 10.
ex. 10, 10/10=1.0mm
attention
If the leg is floating from fingerboard. Slide back the gauge until both legs contact a fingerboard again.
Fret Crown height
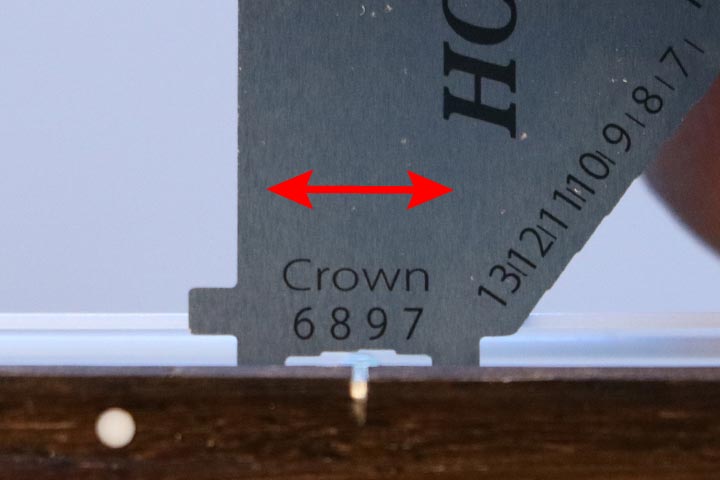
STEP. 1
Set Step Gauge (Crown part) over a fret which you want to check.
Slide the gauge to right and left and find the position fret crown top contacts gauge.
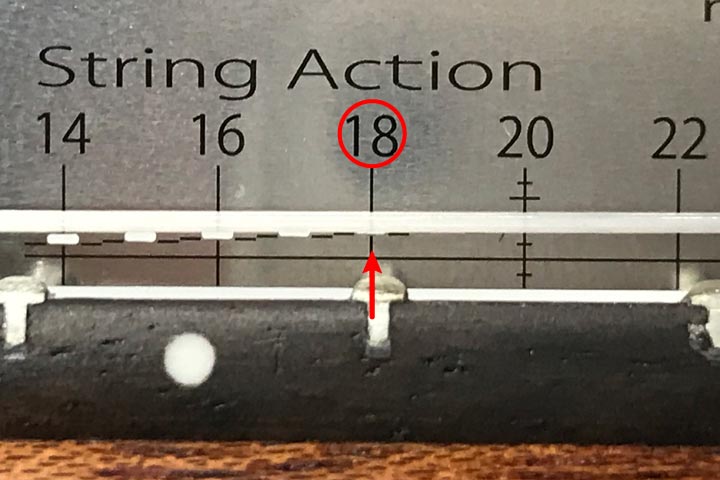
STEP. 2
Read the number on the fret crown. Number is 10 times of mm. So divide by 10.
ex. 6, 6/10=0.6mm
String Action
STEP. 1
Set Step Gauge (String Action part) at the position which you want to check on the fingerboard.
STEP. 2
Slide the gauge to right and left and find the same position as the string bottom.
STEP. 3
Read the number. Number is 10 times of mm. So divide by 10.
ex. 18, 18/10=1.8mm
3 basic functions
“Nut slot height”
by 0.1mm correctly
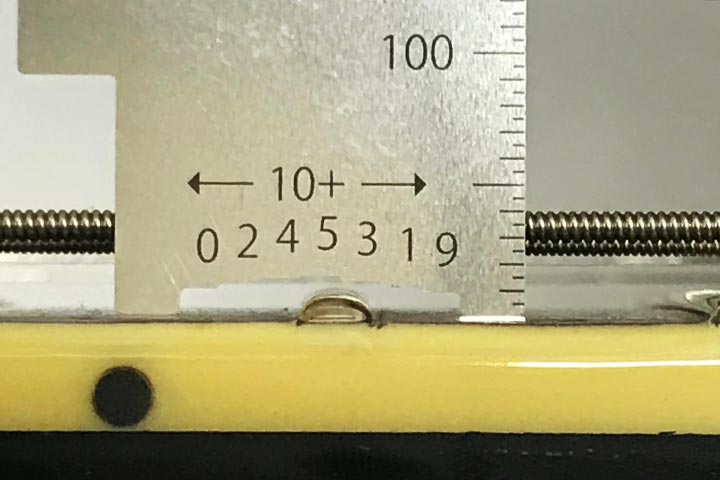
“Fret crown height”
by 0.1mm quickly
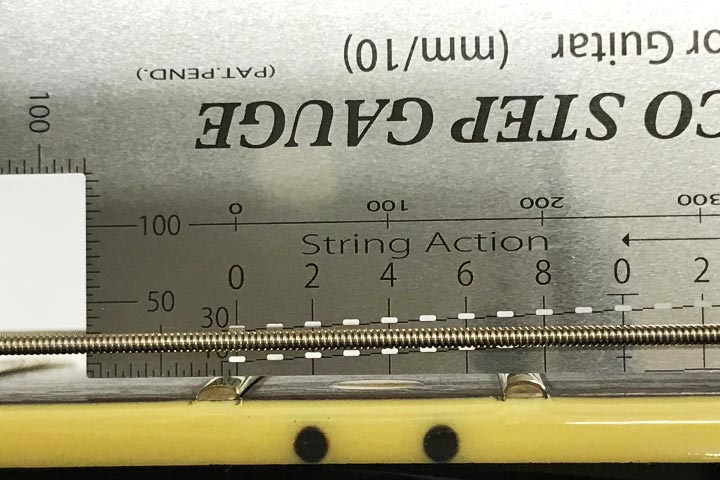
“String action”
by 0.1mm clearly with slits
Other functions
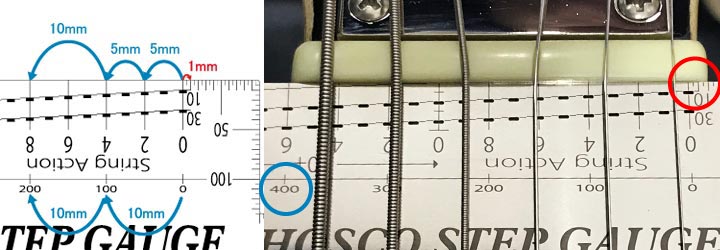
Nut width (400+20) /10=42mm
Pickup height
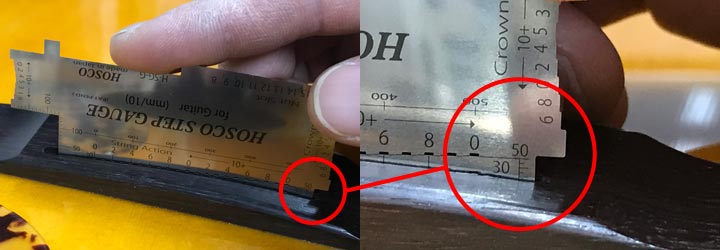
Saddle Slot depth
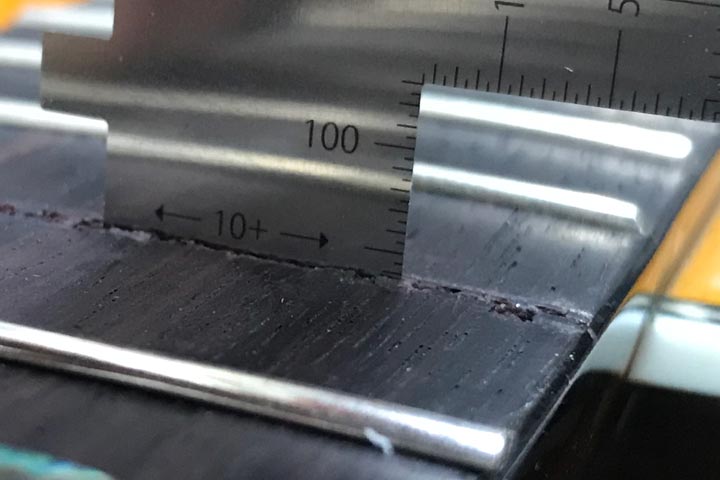
Fret Slot depth
How to use
Nut Slot height
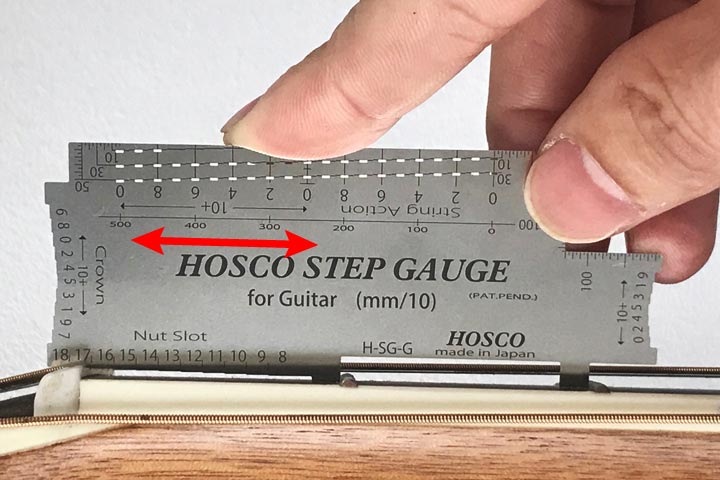
STEP. 1
Set Step Gauge (Nut Slot part) in the string slot which you want to check, and then put Step Gauge
(2 legs) to contact a fingerboard. Slide the gauge to headstock keeping both legs contacting a fingerboard. Step Gauge will stop when the gauge contacts nut slot.
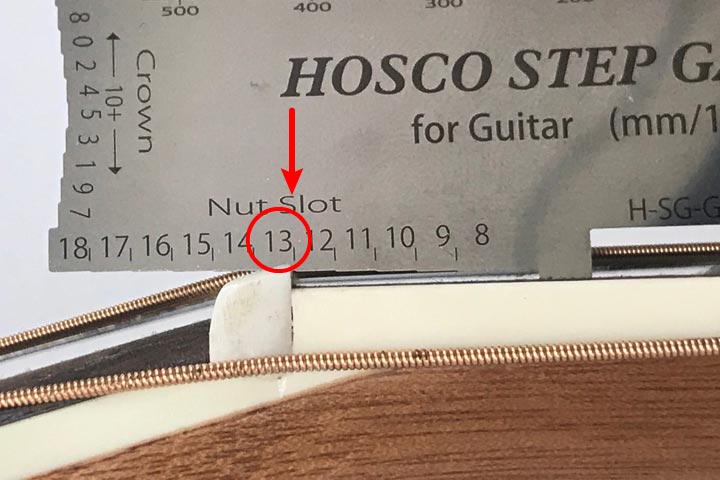
STEP. 2
Read the number on the nut. Number is 10 times of mm. So divide by 10.
ex. 13, 13/10=1.3mm
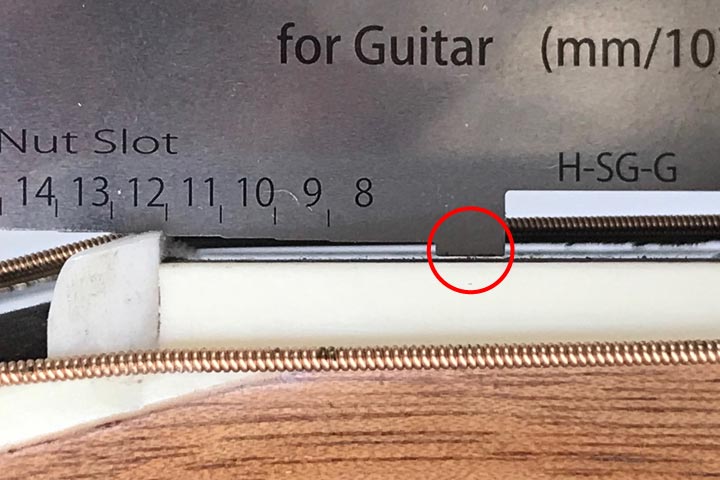
attention
If the leg is floating from fingerboard. Slide back the gauge until both legs contact a fingerboard again.
Fret Crown height
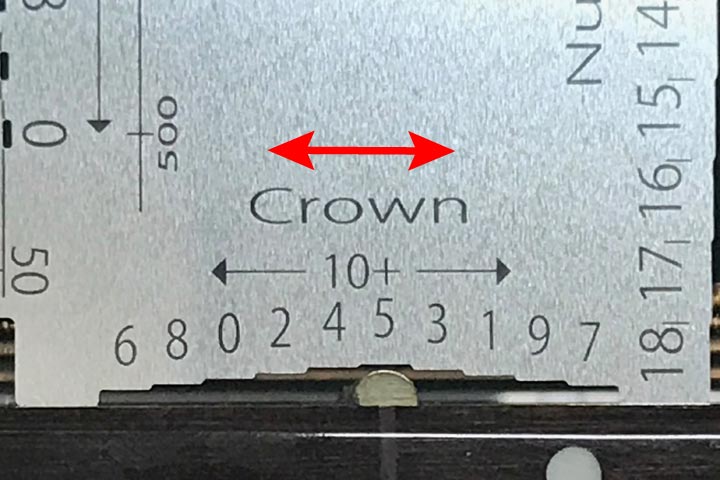
STEP. 1
Set Step Gauge (Crown part) over a fret which you want to check.
Slide the gauge to right and left and find the position fret crown top contacts gauge.
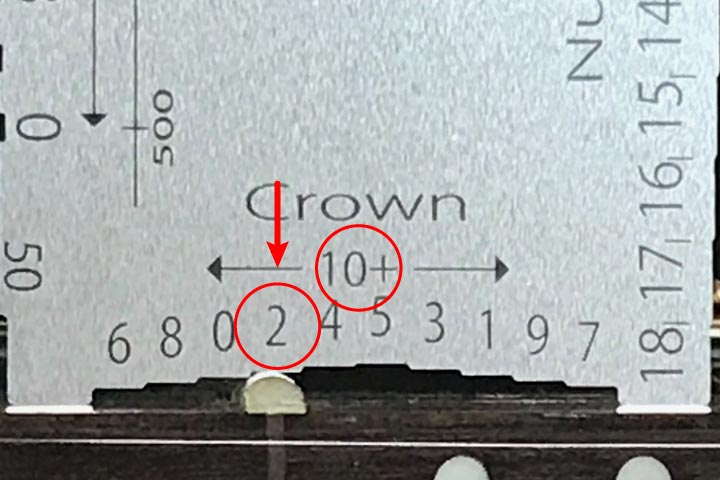
STEP. 2
Read the number on the fret crown. Number is 10 times of mm. So divide by 10.
ex. 10+2=12, 12/10 =1.2mm
String Action
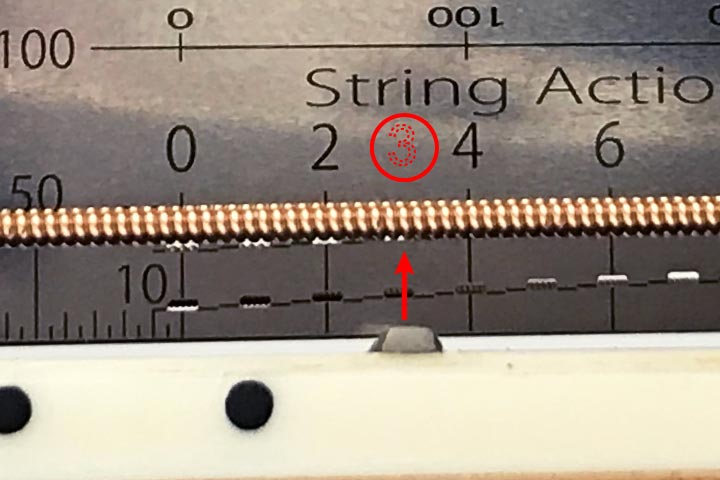
STEP. 1
Set Step Gauge (String Action part) at the position which you want to check on the fingerboard.
STEP. 2
Slide the gauge to right and left and find the same position as the string bottom. 3 : There are slits every 0.1mm level. So easy to see the level checking.
STEP. 3
Read the number. Number is 10 times of mm. So divide by 10.
ex. 33, 33/10=3.3mm
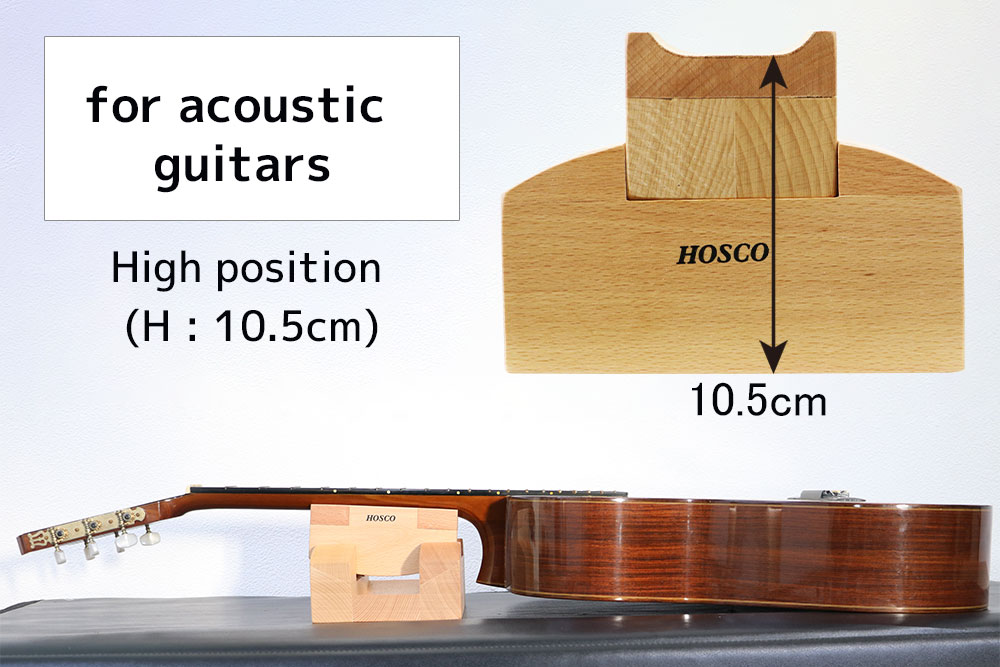
2-Way Neck Support
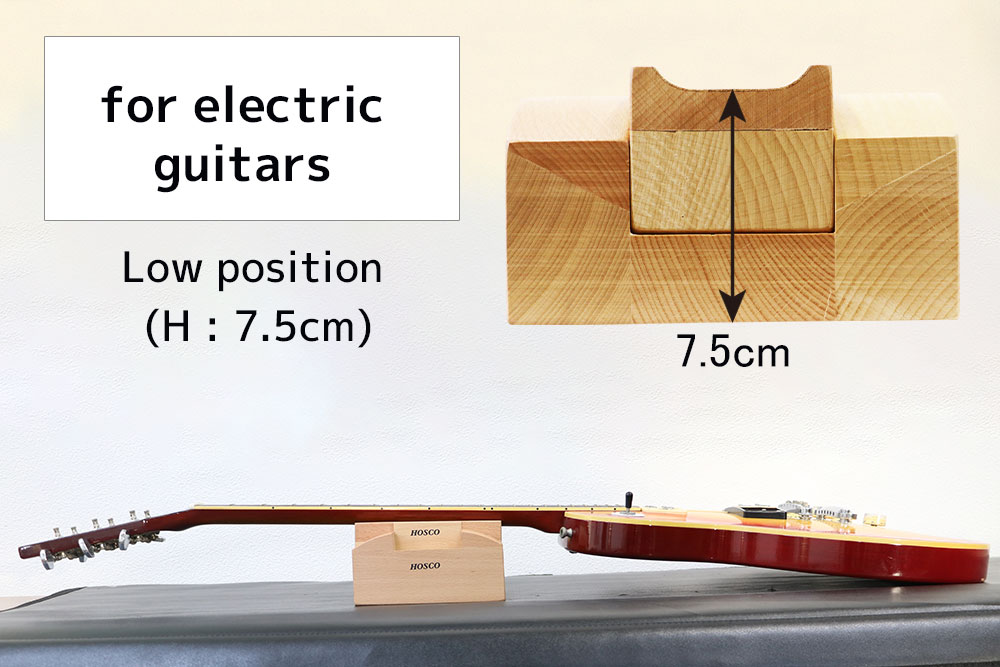
Other uses
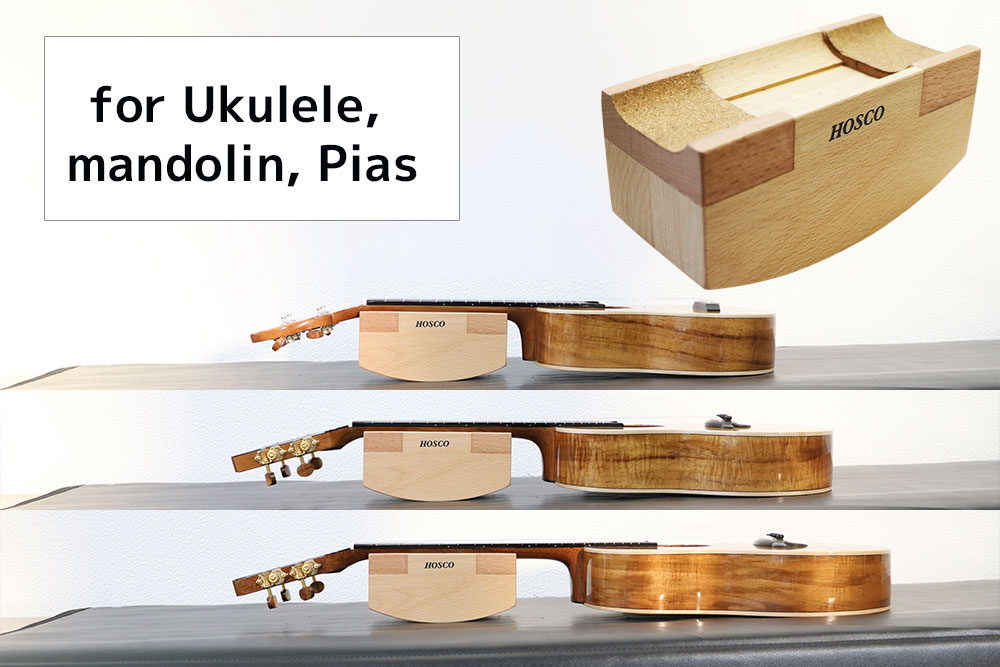
You can support thin instruments such as Ukuleles with only the top part.
Note
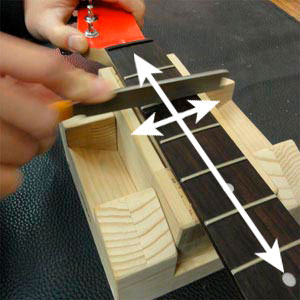
H-NSG gives you a good stability not only fret leveling job direction, but also fret crowning job direction.
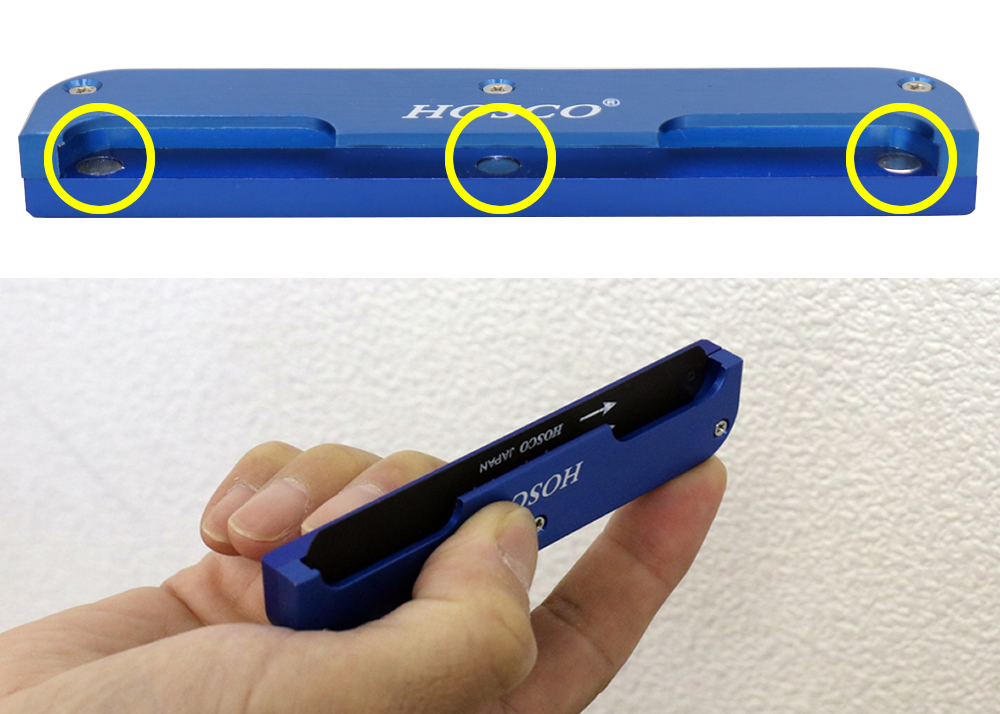
The 3 strong magnets hold the file of every thickness straight.
Even if they are thinner files (.009″, .010″, .012″), the holder makes them strong against warping.
The side cutting of the aluminum holder makes a better visibility of filing point and the round edge of the blade won’t hit the headstock easily.
The following files with different gauge are available individually.
| 0.009” | 0.010” | 0.012” | 0.013” | 0.016” |
| 0.024” | 0.028” | 0.032” | 0.036” | 0.040” |
| 0.042” | 0.046” | 0.050” | 0.054” | 0.065” |
| 0.075” | 0.085” | 0.090” | 0.105” | 0.130” |
All these nut files are done with blackening treatment which is black oxide finish.
The 3 strong magnets hold the file of every thickness straight.
Even if they are thinner files (.009″, .010″, .012″), the holder makes them strong against warping.
The side cutting of the aluminum holder makes a better visibility of filing point and the round edge of the blade won’t hit the headstock easily.
The following files with different gauge are available individually.
| 0.009” | 0.010” | 0.012” | 0.013” | 0.016” |
| 0.024” | 0.028” | 0.032” | 0.036” | 0.040” |
| 0.042” | 0.046” | 0.050” | 0.054” | 0.065” |
| 0.075” | 0.085” | 0.090” | 0.105” | 0.130” |
All these nut files are done with blackening treatment which is black oxide finish.
The 3 strong magnets hold the file of every thickness straight.
Even if they are thinner files (.009″, .010″, .012″), the holder makes them strong against warping.
The side cutting of the aluminum holder makes a better visibility of filing point and the round edge of the blade won’t hit the headstock easily.
The following files with different gauge are available individually.
| 0.009” | 0.010” | 0.012” | 0.013” | 0.016” |
| 0.024” | 0.028” | 0.032” | 0.036” | 0.040” |
| 0.042” | 0.046” | 0.050” | 0.054” | 0.065” |
| 0.075” | 0.085” | 0.090” | 0.105” | 0.130” |
All these nut files are done with blackening treatment which is black oxide finish.
The 3 strong magnets hold the file of every thickness straight.
Even if they are thinner files (.009″, .010″, .012″), the holder makes them strong against warping.
The side cutting of the aluminum holder makes a better visibility of filing point and the round edge of the blade won’t hit the headstock easily.
The following files with different gauge are available individually.
| 0.009” | 0.010” | 0.012” | 0.013” | 0.016” |
| 0.024” | 0.028” | 0.032” | 0.036” | 0.040” |
| 0.042” | 0.046” | 0.050” | 0.054” | 0.065” |
| 0.075” | 0.085” | 0.090” | 0.105” | 0.130” |
All these nut files are done with blackening treatment which is black oxide finish.
The 3 strong magnets hold the file of every thickness straight.
Even if they are thinner files (.009″, .010″, .012″), the holder makes them strong against warping.
The side cutting of the aluminum holder makes a better visibility of filing point and the round edge of the blade won’t hit the headstock easily.
The following files with different gauge are available individually.
| 0.009” | 0.010” | 0.012” | 0.013” | 0.016” |
| 0.024” | 0.028” | 0.032” | 0.036” | 0.040” |
| 0.042” | 0.046” | 0.050” | 0.054” | 0.065” |
| 0.075” | 0.085” | 0.090” | 0.105” | 0.130” |
All these nut files are done with blackening treatment which is black oxide finish.